It’s the most wonderful time of the year……to prepare for next year!
As the end of the year rapidly approaches, there are important tasks that need to be done at your office to prepare for 2019. Over the next few weeks, we’re going to talk about some of these tasks to get your office ready for the new year.
Let’s start by talking about office fee schedules. It’s important to review your office fees on an annual basis. You can evaluate and compare your office fees to others in your area by using a guide like the National Dental Advisory Service Fee Report Book. This can help you to see how your office fees compare to other dental offices in your zip code and if you should consider raising your fees. Raising your office fees can improve the revenue for the practice, but you also don’t want to price yourself out of the market.
Updating Insurance Fee Schedules
When you are thinking of updating fee schedules, it’s also important to request an updated fee schedule from all insurance companies your office participates with. Depending on the insurance company, you may have to call or e-mail the provider relations department or you may have to send a written request. Once you have received the updated fee schedules from the insurance company, you can edit your fee schedules in Dentrix to reflect the insurance fees.
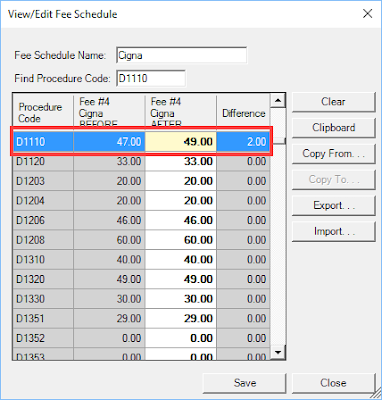
Open the Office Manager, and select Maintenance > Practice Setup > Fee Schedule Setup. Choose an insurance fee schedule, then select View/Edit.
Select the code you want to edit from the list of procedure codes. For example, if you wanted to update the fee for an adult prophylaxis, select D1110 and click in the AFTER field and enter the updated fee (in dollars). You can move on to the next procedure code to update, or if you’re done, choose Save, then Close.
Updating the Office Fee Schedule
Once you have made a decision about how you want to update your office fee schedule, you can choose to increase your fee schedule by a percentage or by a dollar amount using the Auto Changes button in Dentrix. Open the Office Manager and select Maintenance > Practice Setup > Fee schedule Setup. Select the fee schedule you want to change, then click Auto Changes.
You can choose to update all procedure codes, or you can enter a procedure code range. From this screen you also have the ability to increase (or decrease) fees by a percentage or a dollar amount.
You can also manually edit individual fees by procedure code. Open the Office Manager and select Maintenance > Practice Setup > Fee Schedule Setup. Choose the appropriate fee schedule, then select View/Edit. Select a procedure code from the list, make changes to the AFTER column, and then click Save.
One thing to keep in mind when you update or edit a fee schedule, is that when you enter a create a new treatment plan for a patient, the updated fees will be reflected. Patients who have an existing treatment plan will not reflect the updated fees.
Taking the time to update your office fees and requesting information from your insurance carriers so you can update your insurance fee schedules, will result in higher production and collections for the office. I find that making this a part of my end of year routine ensures that it gets done consistently on an annual basis.
Join me next week when we’ll discuss more end-of-year tasks.
If you have questions about this or other topics, please e-mail me at vectordentalconsulting@gmail.com.
 Charlotte Skaggs, Certified Dentrix Trainer
Charlotte Skaggs is the founder of Vector Dental Consulting LLC, a practice management firm focused on taking offices to the next level. Charlotte co-owned and managed a successful dental practice with her husband for 17 years. She has a unique approach to consulting based on the perspective of a practice owner. Charlotte has been using Dentrix for almost 20 years and is a certified Dentrix trainer. Contact Charlotte at vectordentalconsulting@gmail.com.
from The Dentrix Office Manager Blog https://ift.tt/2FjKPzH


0 comments:
Post a Comment